By Glyf
Receipt Photo Best Practices
Before you take the shot, run through this: receipt flat on a surface, not held in your hand. Even light, no direct flash. Full receipt inside the frame, top and bottom both visible. Phone held straight above it, not at an angle. Focus locked before you tap the shutter. Five things, thirty seconds, and most of the receipt photo problems that cause bad extractions never happen in the first place.
Receipt photo best practices matter because the photo is the only version of the document the Data Extraction Engine ever sees. It can't infer a number that's cropped out of frame or guess at text buried under glare. Glyf processes receipt photos automatically, but a clearer source image consistently means a faster review and fewer corrections afterward.
Why receipt photo quality moves the needle
Receipt paper starts out difficult before your camera gets involved. Thermal print fades over time, contrast runs low even on a fresh receipt, and the fields people care about most (total, tax, tip) usually sit crammed into the bottom few centimeters of the page. Add blur, glare, an awkward crop, or dim lighting on top of that, and a document that was already borderline tips over into unreadable. None of this means an imperfect photo automatically fails. It means the fixes are small and the payoff is disproportionate: a few seconds of care before the shutter clicks routinely saves several minutes of correction after the results come back.
Receipt photo best practices, expanded
Flat surface first: place the receipt down rather than holding it, since even a slight hand tremor shows up as blur once you zoom into a photo taken up close. Even lighting next: natural light near a window beats a single overhead bulb, and a direct flash tends to blow out glossy receipt paper or create a bright spot exactly where the total sits. Full frame: leave visible margin on every side so nothing at the edges gets clipped, since a missing top line or bottom row is unrecoverable once the photo's taken. Straight-on angle: hold the phone directly above the receipt rather than tilted, because an angled shot compresses text on one side and stretches it on the other. Steady hands and locked focus: tap the screen to focus before shooting, and take a second photo if the first one feels uncertain rather than uploading it and hoping.
The part people skip: checking before upload
Zoom into the photo once before you upload it and look at three specific areas: the merchant name near the top, the date somewhere in the header, and the totals block at the bottom. If all three read clearly at that zoom level, the photo is very likely good enough. If any one of them looks soft, dark, or partially cut off, retaking the photo now costs seconds. Finding out after the results come back costs a trip back to the drawer to fix a field manually. Glyf also validates each file for type and size the moment you add it (PDF, JPG, PNG, or WEBP, up to 10MB) directly in the browser, before anything is sent for analysis, so an unsupported or oversized file gets flagged immediately rather than after a wasted upload.
Where the flat, straight, well-lit photo pays off
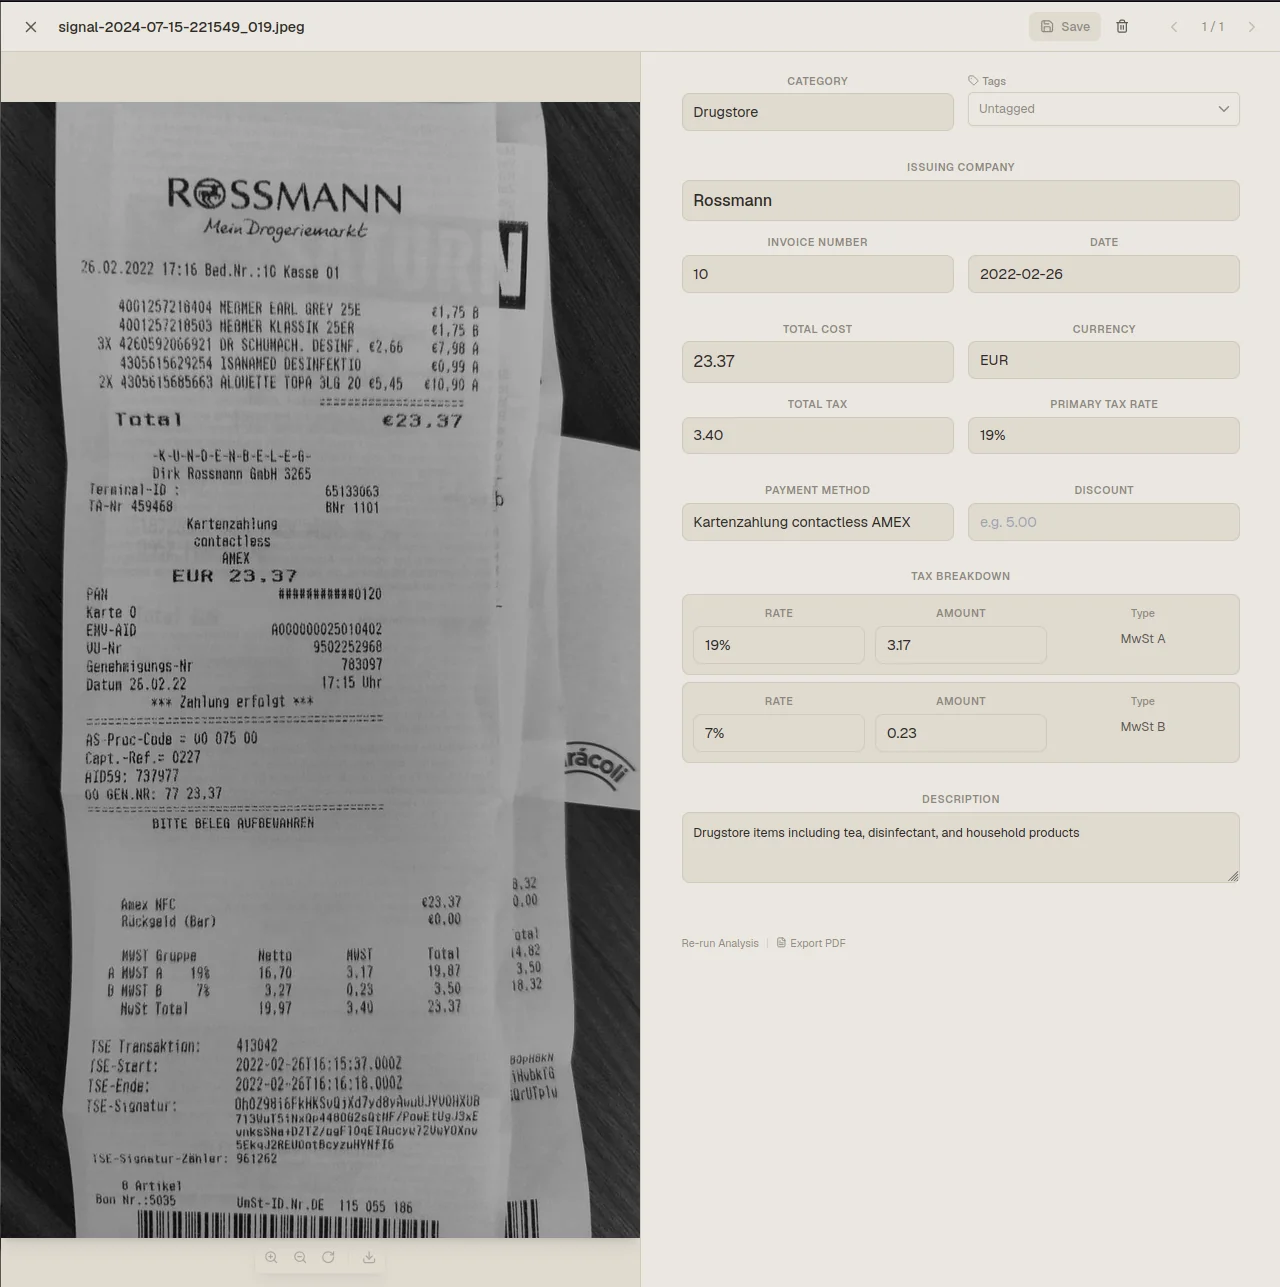
Once the source photo is solid, the rest of the workflow does the heavy lifting. Upload the receipt, let the Data Extraction Engine return the structured fields, then review results in the Invoice Drawer with the original image next to the extracted data. A well-lit, straight-on photo tends to need little more than a glance and a save; a dark, angled one tends to need several fields corrected by hand. Over 95% extraction accuracy on standard receipts and invoices assumes a reasonably legible source. The checklist above is what keeps your photos on the easy side of that line rather than the hard side.
When the receipt itself is the problem, not the photo
Sometimes no amount of good technique rescues a receipt that's already faded, torn, or crumpled beyond what light and angle can fix. Those documents get their own set of prep steps, separate from general photo technique. See Faded/Crumpled Receipts for damage-specific handling. For the broader receipt workflow this checklist feeds into, see Intelligent Extraction for Receipts.
Try it on a handful first
Don't test this checklist against a shoebox of a hundred old receipts on day one. Pick five or six, run through the flat-surface, even-light, full-frame routine, upload them, and compare the results against what you'd expect. The difference between a rushed photo and a careful one becomes obvious fast, and from there the habit sticks on its own.
FAQ
Does photo quality actually change extraction accuracy, or is that overstated? It genuinely matters. Low light, glare, and cropped edges are the most common reasons a field comes back missing or wrong. Fixing those at the photo stage is the highest-leverage change available before upload.
What file types work best for receipt photos? JPG, PNG, and WEBP all work, along with PDF for anything already digital. Format matters less than lighting and framing. A clear JPG usually outperforms a blurry PDF scan.
Is there a file size limit I should know about before uploading a batch? Yes: 10MB per file, checked immediately in the browser when you add it, so an oversized file gets flagged before you waste time waiting on an upload that won't go through.